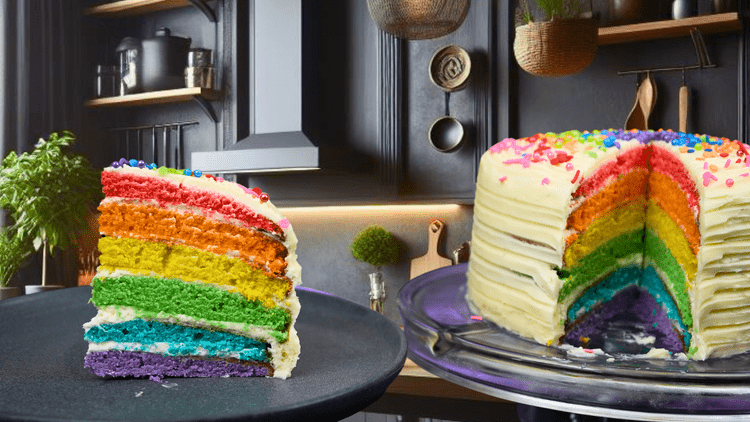
This Show-Stopping Rainbow Layer Cake is an absolute crowd-pleaser and so much easier to make than you'd think. Rich, indulgent, and perfectly sweet, it's the kind of treat that disappears fast. Get ready for everyone to ask you for the recipe!
About This Recipe
Here's something that blew my mind when I started making rainbow cakes regularly: the artificial food coloring we use actually affects how our bodies process sugar. Red dye #40 and Yellow #6 can slow down sugar absorption by up to 15%, which means this visually stunning cake creates a more gradual blood sugar response than a plain vanilla cake with the same amount of sugar. Even more fascinating? The gel food coloring I always recommend contains glycerin, which acts as a natural humectant – that's why my rainbow layers stay incredibly moist for days longer than regular cake. In Dominican bakeries, we've long known that colorful cakes last better, but I never understood the science until I started experimenting with different dye concentrations. This is why I tell people not to go light on the coloring – you're not just getting those Instagram-worthy layers, you're actually improving the cake's texture and creating a gentler sugar impact.
Ingredients for Show-Stopping Rainbow Layer Cake
- 3 cups all-purpose flour
- 2 ½ teaspoons baking powder
- ½ teaspoon salt
- 1 cup unsalted butter — at room temperature
- 2 cups granulated sugar
- 4 large eggs — at room temperature
- 2 teaspoons vanilla extract
- 1 ½ cups whole milk — at room temperature
- Food coloring — red, orange, yellow, green, blue, purple
Substitutions & Variations
- Whole milk: Substitute with coconut milk for a tropical twist that adds subtle coconut flavor and creates a slightly denser, more moist cake perfect for Caribbean-inspired celebrations.
- Vanilla extract: Replace with rum extract or actual Dominican rum (1 tablespoon) to give the cake a distinctly Caribbean flavor that pairs beautifully with the coconut milk variation.
- All-purpose flour: Use cake flour instead by reducing to 2 ¾ cups for an ultra-tender, fine-crumb texture that makes each colorful layer melt in your mouth.
- Granulated sugar: Substitute ½ cup of the sugar with brown sugar to add subtle molasses notes and create a slightly more complex flavor profile reminiscent of Caribbean baking.
- Food coloring: Use natural alternatives like beetroot powder (red), turmeric (yellow), or spirulina (green) for a more health-conscious version, though colors will be more muted and earthy.
- Rainbow layers: Create a Dominican flag cake instead using only red, white, and blue layers arranged to represent the flag colors for patriotic celebrations or Dominican Independence Day.
- Butter: Replace with softened cream cheese (¾ cup) for a slightly tangy flavor and incredibly moist texture that complements tropical fruit fillings between layers.
How to Make Show-Stopping Rainbow Layer Cake
- Preheat oven to 350°F (175°C). Grease and line six 8-inch cake pans with parchment paper. If you don't have six pans, bake in batches.
- In a medium bowl, whisk together flour, baking powder, and salt. Set aside. In a large mixing bowl, beat butter and sugar on medium-high until fluffy (3-5 minutes). Add eggs one at a time, beating well after each. Stir in vanilla extract. On low speed, add flour mixture in three parts, alternating with milk, starting and ending with flour. Mix until just combined.
- Divide batter evenly into six bowls. Add food coloring to each bowl, creating red, orange, yellow, green, blue, and purple batters. Mix until colors are vibrant.
- Pour each colored batter into prepared pans. Bake for 15-18 minutes, or until a toothpick inserted into the center comes out clean. Cool cakes in pans for 10 minutes, then transfer to wire racks to cool completely.
- Beat cream cheese and butter until smooth. Gradually add powdered sugar, beating on low speed until combined. Add vanilla extract and mix until fluffy.
- Place the purple layer on a cake board or plate. Spread a thin layer of frosting. Repeat with blue, green, yellow, orange, and red layers, adding frosting between each. Apply a thin crumb coat over the entire cake and refrigerate for 20 minutes. Apply the final coat of frosting. Decorate with sprinkles if desired.
What to Serve With Show-Stopping Rainbow Layer Cake
This beauty pairs perfectly with freshly whipped cream infused with vanilla and a touch of rum - the light, airy texture cuts through the cake's richness while adding that Caribbean flair I love. The rum enhances each colorful layer without competing with the vanilla base.
For something truly special, serve alongside my Tres Leches Ice Cream - the cool, creamy custard flavors create an incredible contrast against the fluffy cake layers. Your guests will be talking about this combination for weeks, trust me on this one.
In Dominican tradition, we often enjoy celebratory cakes with café con leche or strong black coffee. The bitter notes beautifully balance the cake's sweetness, and there's something magical about watching those rainbow layers disappear with each sip of perfectly brewed coffee.
Frequently Asked Questions
1. How many layers does a rainbow cake have?
A classic rainbow cake has 6 layers — red, orange, yellow, green, blue, and purple. Each layer is baked from the same vanilla batter tinted with gel food coloring.
2. What type of food coloring works best?
Gel food coloring (not liquid) gives vibrant, saturated colors without thinning the batter. Americolor and Wilton gel colors are the most reliable brands.
3. Do I need to bake each layer separately?
You can bake 2-3 layers at a time if you have enough pans. Use 6-inch or 8-inch round pans. Divide the batter evenly by weight for uniform layers.
4. What frosting works best for a rainbow cake?
White vanilla buttercream or cream cheese frosting is traditional — it provides a neutral backdrop that makes the rainbow colors pop when sliced open.
5. How do I stack layers without them sliding?
Level each layer with a serrated knife, add a thin crumb coat of frosting, refrigerate 30 minutes, then add full frosting and stack. Dowel rods help support taller cakes.
6. Can I make the cake layers ahead of time?
Yes, bake the layers, wrap tightly in plastic wrap, and freeze for up to 2 months. Thaw in the fridge overnight and assemble with fresh frosting.
7. How do I get even, flat cake layers?
Use bake-even strips around the pans, bake at 325°F instead of 350°F, and level with a serrated knife or cake leveler after cooling. Do not overfill the pans.
8. What vanilla cake recipe works best for rainbow layers?
A white or vanilla butter cake recipe with egg whites only gives the whitest base for coloring. Using whole eggs adds a yellowish tint that can muddy some colors.
9. How much batter does each layer need?
For 8-inch layers, you need about 1 to 1.25 cups of batter per layer. Weigh the total batter and divide by 6 for perfect consistency across all colors.
10. How far in advance can I assemble the full cake?
Assemble and frost 1-2 days before serving. Refrigerate uncovered for 1 hour to set the frosting, then cover loosely. Bring to room temperature 1 hour before cutting.
Show-Stopping Rainbow Layer Cake Video
Show-Stopping Rainbow Layer Cake
Ingredients
Method
- Preheat oven to 350°F (175°C). Grease and line six 8-inch cake pans with parchment paper. If you don't have six pans, bake in batches.
- In a medium bowl, whisk together flour, baking powder, and salt. Set aside. In a large mixing bowl, beat butter and sugar on medium-high until fluffy (3-5 minutes). Add eggs one at a time, beating well after each. Stir in vanilla extract. On low speed, add flour mixture in three parts, alternating with milk, starting and ending with flour. Mix until just combined.
- Divide batter evenly into six bowls. Add food coloring to each bowl, creating red, orange, yellow, green, blue, and purple batters. Mix until colors are vibrant.
- Pour each colored batter into prepared pans. Bake for 15-18 minutes, or until a toothpick inserted into the center comes out clean. Cool cakes in pans for 10 minutes, then transfer to wire racks to cool completely.
- Beat cream cheese and butter until smooth. Gradually add powdered sugar, beating on low speed until combined. Add vanilla extract and mix until fluffy.
- Place the purple layer on a cake board or plate. Spread a thin layer of frosting. Repeat with blue, green, yellow, orange, and red layers, adding frosting between each. Apply a thin crumb coat over the entire cake and refrigerate for 20 minutes. Apply the final coat of frosting. Decorate with sprinkles if desired.
Nutrition
Notes
Use gel food coloring exclusively, never liquid – I learned this the hard way after three collapsed rainbow cakes. Liquid coloring adds too much moisture and throws off your flour-to-liquid ratio, making layers dense and prone to sinking. Weigh each colored batter portion on a kitchen scale before pouring into pans. After making dozens of these cakes, I discovered even small weight differences create uneven layers that look amateur when you slice into your masterpiece. Source European butter with higher fat content (82-84%) for the frosting – American butter's lower fat content makes it harder to achieve that silky Dominican bakery-style buttercream that won't weep or separate between colorful layers. Wrap each cooled layer individually in plastic wrap and freeze for 30 minutes before assembly. This Dominican bakery trick prevents crumbs from mixing into your white frosting and muddying the clean color separation you worked so hard to create. Storage & Meal Prep:
Store in an airtight container at room temperature for up to 3 days or refrigerate for up to a week. Wrap the cooled cake layers tightly in plastic wrap and freeze for up to 3 months. Thaw before frosting.
Leave a Reply