
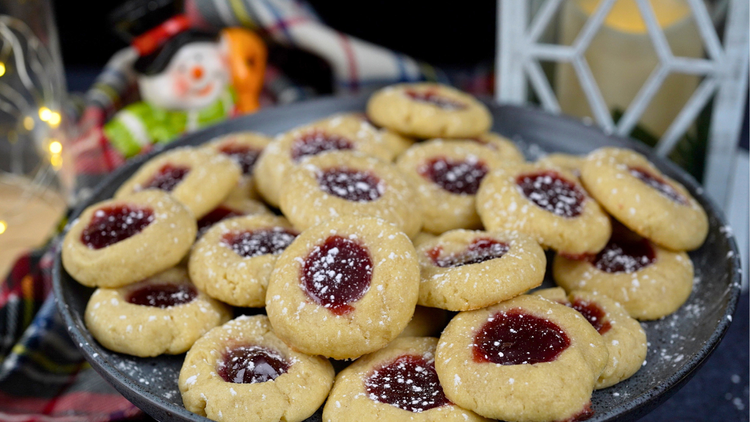
This Thumbprint Cookies is an absolute crowd-pleaser and so much easier to make than you'd think. Rich, indulgent, and perfectly sweet, it's the kind of treat that disappears fast. Get ready for everyone to ask you for the recipe!

About This Recipe
Here's the beautiful science behind thumbprint cookies: when you press that signature dimple, you're creating a steam trap that actually helps the jam set perfectly. The depression concentrates heat and moisture, causing the pectin in your jam to gel faster and more completely than it would on a flat surface. But here's what most home cooks don't realize – the cookie dough around that thumbprint acts like a tiny oven wall, reflecting heat back toward the center. This creates a microclimate that's about 15-20 degrees hotter than the surrounding oven temperature. That's why your jam gets that gorgeous, glossy finish without burning. The butter in the dough also plays a crucial role here – as it melts, it creates a waterproof barrier that prevents the jam from soaking into the cookie and making it soggy. It's like nature's own little jam-making laboratory happening right in your oven.
Ingredients for Thumbprint Cookies
- 1 cup (2 sticks) Unsalted Butter, softened
- ⅔ cup Granulated Sugar
- 2 Egg Yolks
- 2 teaspoons Vanilla Extract
- 2 ½ cups All-Purpose Flour
- ½ teaspoon Salt
- ½ cup Jam of your choice
How to Make Thumbprint Cookies
- In the bowl of a standing mixer fitted with a paddle attachment, cream together the butter and sugar for about a minute until light and incorporated. Add the egg yolks and extract, then mix for another minute, scraping the sides of the bowl occasionally.
- Add the flour and salt, and mix until the dough comes together.
- Line a large baking sheet with parchment paper. Using a one tablespoon-size cookie scoop, scoop the cookie dough onto the baking sheet. Roll each ball of cookie dough between your palms until smooth.
- Using either your thumb or the back of a round ½ teaspoon, gently make an indent in the center of each cookie. Place the baking sheet in the freezer for 20 minutes.
- Preheat your oven to 350 degrees. Bake for 12-14 minutes or until the edges are lightly golden.
- Remove from oven and let cool on the baking sheet for 5 minutes. Fill each indent with about half a teaspoon of your favorite jam. Transfer to a wire rack to cool completely.
What to Serve With Thumbprint Cookies
These buttery cookies are absolutely perfect alongside a steaming cup of Dominican café con leche or hot chocolate. The rich, creamy drinks balance the sweet jam centers beautifully, and it's exactly how my abuela served cookies during our afternoon meriendas back home.
For something unexpected, try pairing these with my Tres Leches Cake for a dessert spread that'll have everyone talking. The cookies provide a delightful textural contrast to the moist, creamy cake, and both treats share that comforting, homestyle sweetness that makes any gathering feel special.
Fresh berries and whipped cream create an elegant presentation that lets the cookies shine as part of a larger dessert platter. The tartness of strawberries or raspberries plays beautifully against the sweet jam centers, while the cream adds richness without overwhelming these delicate treats.
Frequently Asked Questions
1. Can I use salted butter instead of unsalted butter for thumbprint cookies?
While you can use salted butter, it is advisable to use unsalted butter and add the specified amount of salt separately. This gives you better control over the overall saltiness of the cookies.
2. What other types of extract can I use besides vanilla or almond?
You can experiment with other extracts like lemon, orange, or even coconut to add different flavor profiles to your thumbprint cookies.
3. Can I use a hand mixer instead of a standing mixer?
Yes, you can use a hand mixer if you don't have a standing mixer. Ensure thorough mixing and occasional scraping of the bowl for even incorporation.
4. Do I have to freeze the thumbprint cookie dough before baking?
Freezing the cookie dough helps the cookies maintain their shape and prevents excessive spreading during baking. It's a crucial step for achieving the desired texture.
5. What other types of jam work well with thumbprint cookies?
While raspberry jam is recommended, you can use other fruit jams like strawberry, apricot, or cherry based on your preference.
6. Can I make the thumbprint cookie dough ahead of time and freeze it?
Yes, you can freeze the cookie dough for later use. Ensure it's well-wrapped to prevent freezer burn. Thaw in the refrigerator before shaping and baking.
7. Can I replace the powdered sugar coating with something else?
Absolutely. You can roll the cookies in finely chopped nuts, sprinkles, or even leave them plain for a simpler look.
8. How do I make a perfect thumbprint indentation without cracking the dough?
Use your thumb or the back of a rounded teaspoon to press gently into the center of each ball while the dough is still soft. If cracks appear, smooth them with your finger.
9. Why did my thumbprint cookies spread too much during baking?
The butter may have been too warm, or the dough was not chilled long enough. Always chill the shaped cookies for at least 15 minutes before baking for the best shape retention.
10. How do I store thumbprint cookies so the jam stays fresh?
Store in an airtight container at room temperature with parchment paper between layers for up to 5 days. The jam sets as it cools and stays vibrant for days. Do not refrigerate as the cookies will lose their tender texture.
Thumbprint Cookies Video
Thumbprint Cookies
Ingredients
Method
- In the bowl of a standing mixer fitted with a paddle attachment, cream together the butter and sugar for about a minute until light and incorporated. Add the egg yolks and extract, then mix for another minute, scraping the sides of the bowl occasionally.
- Add the flour and salt, and mix until the dough comes together.
- Line a large baking sheet with parchment paper. Using a one tablespoon-size cookie scoop, scoop the cookie dough onto the baking sheet. Roll each ball of cookie dough between your palms until smooth.
- Using either your thumb or the back of a round ½ teaspoon, gently make an indent in the center of each cookie. Place the baking sheet in the freezer for 20 minutes.
- Preheat your oven to 350 degrees. Bake for 12-14 minutes or until the edges are lightly golden.
- Remove from oven and let cool on the baking sheet for 5 minutes. Fill each indent with about half a teaspoon of your favorite jam. Transfer to a wire rack to cool completely.
Nutrition
Notes
Use guava paste instead of regular jam – thin it with a tablespoon of rum and a squeeze of lime. The alcohol evaporates during baking, leaving behind complex flavor notes that pair beautifully with the buttery cookie, and the paste holds its shape better than loose jam. Press your thumbprints when the dough is slightly chilled but not rock-hard – about 15 minutes in the fridge. If it's too soft, the walls collapse; too hard and they crack. The dough should give way smoothly without the edges splitting. After twelve years of making these, I've learned to re-press the thumbprints halfway through baking when they start to puff up. The cookies are forgiving at this stage, and this second press ensures your jam pocket stays deep and defined. Choose jam with visible fruit pieces rather than smooth varieties – the fruit chunks create texture contrast and prevent the filling from becoming too liquid during baking, which can cause overflow and burnt spots on your pan.
Tried this recipe?
Let us know how it was!Filed Under

Leave a Reply