
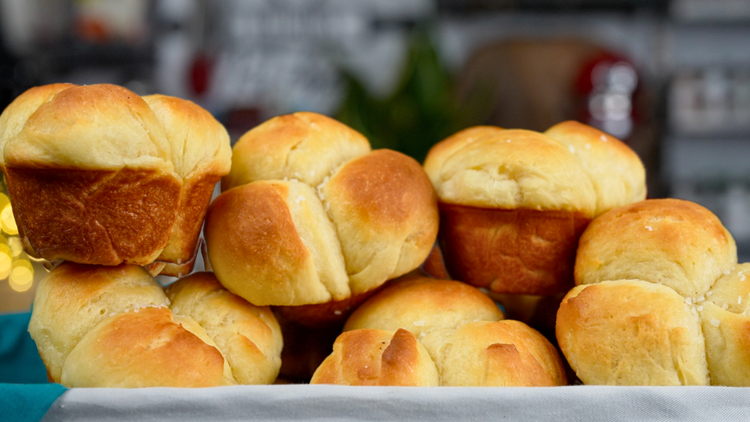
This Homemade Cloverleaf Dinner Rolls is one of those recipes you'll find yourself making over and over again. It's simple, delicious, and always gets rave reviews. Whether you're a beginner or a seasoned cook, you're going to love how easy and tasty this turns out!
About This Recipe
The cloverleaf shape isn't just pretty—it's brilliant food science. When you nestle three small dough balls together, their surfaces create steam pockets as they bake. This trapped moisture keeps the interior incredibly soft while the exposed tops develop that golden crust we love. Here's what most home cooks don't realize: the dough balls actually 'communicate' through shared moisture and heat transfer at their contact points, creating different textures within one roll. The touching surfaces stay pale and pillowy, while the exposed areas caramelize from direct oven heat. This is why cloverleaf rolls have that signature pull-apart tenderness—those contact zones become natural tear lines. The three-ball formation also maximizes surface area for butter absorption, which is why these rolls taste so much richer than a single round roll of the same weight. In my Dominican family, we'd make these for special Sunday dinners, and that contrast between the soft interior and golden exterior reminded me of the best pan tostado from the colmado.
Ingredients for Homemade Cloverleaf Dinner Rolls
- 3 tablespoons of very warm water (between 110 to 115°F)
- 1 packet of active dry yeast
- 1 cup of very warm milk (between 110° to 115°F)
- 5 tablespoons of unsalted, room-temperature butter
- 3 tablespoons of granulated sugar
- 1 teaspoon of fine sea salt
- 1 large egg
- 3 and ½ cups of bread flour
- 4 tablespoons of melted butter (for brushing)
- Kosher salt (for sprinkling)
How to Make Homemade Cloverleaf Dinner Rolls
- Activate the Yeast:
- - In the bowl of your stand mixer, combine 3 tablespoons of very warm water and one packet of active dry yeast. Give it a quick mix and let it rest for about 7 minutes until it becomes foamy on top.
- Prepare the Dough:
- - Add the very warm milk, room-temperature butter, granulated sugar, fine sea salt, and the large egg to the yeast mixture. Attach the whisk attachment to your mixer and combine the ingredients until well mixed.
- Mix the Dough:
- - Switch to the hook attachment and gradually add 3 and ½ cups of bread flour. Start mixing on low and continue adding the flour gradually until it's fully incorporated. Mix for about 10 minutes until the dough is smooth and elastic. Scrape the bottom of the bowl with a spatula as needed.
- First Rise:
- - Grease a large mixing bowl with a little bit of oil. Shape the dough into a ball and transfer it to the greased bowl. Add a splash of oil to the top of the dough. Cover the bowl and let the dough rest for at least 1 and ½ hours, or until it has doubled in size.
- Divide the Dough:
- - Once the dough has doubled in size, transfer it to a clean cutting board. Divide the dough into roughly 36 equal-sized balls. You can use a scale to ensure they are uniform or eyeball it. Cup your hand over each piece and roll it on your work surface to form a ball.
- Shape the Rolls:
- - Spray a 12-cup muffin pan with nonstick cooking spray. Place three dough balls into each muffin cup.
- Second Rise:
- - Cover the muffin pan and let the rolls rise again for about 30 to 45 minutes, or until they have puffed up.
- Preheat and Bake:
- - Preheat your oven to 425°F (220°C). Once the rolls have risen, brush them with 2 tablespoons of melted butter.
- - Bake the rolls in the preheated oven for about 12 to 15 minutes, or until they turn golden brown.
- Final Touch:
- - As soon as the rolls come out of the oven, brush them again with 2 more tablespoons of melted butter and sprinkle a pinch of kosher salt on each roll while they are still warm.
- Serve:
- - Transfer the rolls to a wire rack and let them cool for a few minutes before serving. Enjoy your Homemade Cloverleaf Dinner Rolls!
- Conclusion:
- These Cloverleaf Dinner Rolls are a true homemade delight that will elevate any meal. Make them once, and they'll become a family favorite in no time. Enjoy your baking adventure!
- Sandwich Loaf Bread Recipe
- The Greatest Dinner Rolls
- Moist and Delish Zucchini Bread Recipe
- Soft Pretzels Recipe
What to Serve With Homemade Cloverleaf Dinner Rolls
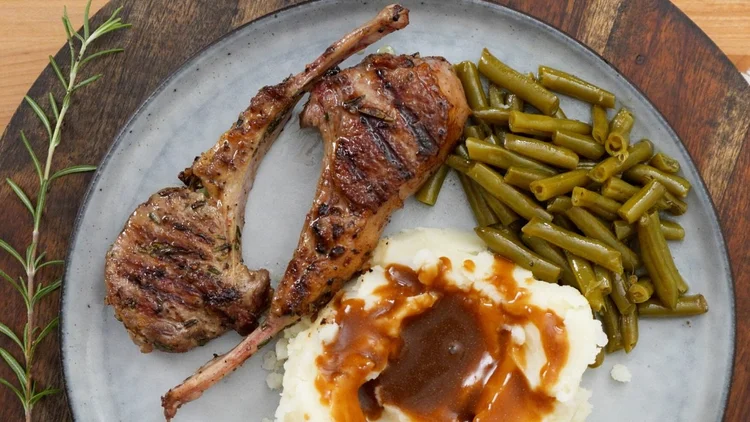
These buttery rolls are perfect alongside my Dominican-style roasted chicken with sofrito - the herbs and garlic in the sofrito create an incredible contrast to the rolls' mild sweetness. The soft, pillowy texture soaks up those amazing pan juices beautifully.
For something completely different, try these with a rich beef stew or braised short ribs. The rolls become little sponges for all that deep, savory gravy, and there's something so satisfying about tearing apart the warm cloverleaf layers to get every last drop.
Don't overlook these rolls with lighter fare like grilled fish or a fresh tomato salad with good olive oil. The bread's richness balances perfectly with bright, acidic flavors, and honestly, sometimes the simplest combinations are the most memorable.
Frequently Asked Questions
1. What are cloverleaf rolls?
Cloverleaf rolls are dinner rolls made by placing three small balls of dough into each muffin tin cup. When baked, they form a three-lobed shape that resembles a clover or shamrock.
2. What makes dinner rolls soft and fluffy?
Milk, butter, and a touch of sugar enrich the dough while bread flour provides structure. Proper kneading develops gluten, and a full rise ensures the lightest, airiest texture.
3. How big should each dough ball be?
About 1 inch in diameter (roughly 1 tablespoon of dough per ball). Three balls per muffin cup. Uniformity is key — consistent sizes bake evenly and look professional.
4. How long does the dough need to rise?
First rise: 1-1.5 hours until doubled. After shaping into cloverleaf form, the second rise takes 30-45 minutes until puffy. Do not rush the rises — patience equals fluffy rolls.
5. What temperature should I bake dinner rolls?
375°F for 15-18 minutes until golden brown on top. They should sound hollow when tapped on the bottom. Brush with melted butter immediately after removing from the oven.
6. Can I make the dough ahead of time?
Yes — after the first rise, punch down and refrigerate overnight. The cold fermentation develops better flavor. Shape into cloverleafs the next morning and let rise before baking.
7. Why are my rolls dense instead of light?
The dough may not have risen long enough, the yeast was dead, or the water was too hot (which kills yeast). Use lukewarm water (105-110°F) and ensure the dough fully doubles in size.
8. Should I use bread flour or all-purpose?
Bread flour creates a slightly chewier roll with better structure. All-purpose makes a softer, more tender roll. Both work — the choice depends on your texture preference.
9. How do I get a shiny, golden top?
Brush with an egg wash (beaten egg + splash of milk) before baking for a shiny, golden crust. Alternatively, brush with melted butter before or after baking for a softer, richer finish.
10. Can I freeze dinner rolls?
Bake, cool completely, and freeze in a zip-top bag for up to 2 months. Reheat in a 350°F oven wrapped in foil for 10 minutes. Or freeze unbaked rolls and thaw overnight before baking fresh.
Homemade Cloverleaf Dinner Rolls Video
Homemade Cloverleaf Dinner Rolls
Ingredients
Method
- Activate the Yeast:
- - In the bowl of your stand mixer, combine 3 tablespoons of very warm water and one packet of active dry yeast. Give it a quick mix and let it rest for about 7 minutes until it becomes foamy on top.
- Prepare the Dough:
- - Add the very warm milk, room-temperature butter, granulated sugar, fine sea salt, and the large egg to the yeast mixture. Attach the whisk attachment to your mixer and combine the ingredients until well mixed.
- Mix the Dough:
- - Switch to the hook attachment and gradually add 3 and ½ cups of bread flour. Start mixing on low and continue adding the flour gradually until it's fully incorporated. Mix for about 10 minutes until the dough is smooth and elastic. Scrape the bottom of the bowl with a spatula as needed.
- First Rise:
- - Grease a large mixing bowl with a little bit of oil. Shape the dough into a ball and transfer it to the greased bowl. Add a splash of oil to the top of the dough. Cover the bowl and let the dough rest for at least 1 and ½ hours, or until it has doubled in size.
- Divide the Dough:
- - Once the dough has doubled in size, transfer it to a clean cutting board. Divide the dough into roughly 36 equal-sized balls. You can use a scale to ensure they are uniform or eyeball it. Cup your hand over each piece and roll it on your work surface to form a ball.
- Shape the Rolls:
- - Spray a 12-cup muffin pan with nonstick cooking spray. Place three dough balls into each muffin cup.
- Second Rise:
- - Cover the muffin pan and let the rolls rise again for about 30 to 45 minutes, or until they have puffed up.
- Preheat and Bake:
- - Preheat your oven to 425°F (220°C). Once the rolls have risen, brush them with 2 tablespoons of melted butter.
- - Bake the rolls in the preheated oven for about 12 to 15 minutes, or until they turn golden brown.
- Final Touch:
- - As soon as the rolls come out of the oven, brush them again with 2 more tablespoons of melted butter and sprinkle a pinch of kosher salt on each roll while they are still warm.
- Serve:
- - Transfer the rolls to a wire rack and let them cool for a few minutes before serving. Enjoy your Homemade Cloverleaf Dinner Rolls!
- Conclusion:
- These Cloverleaf Dinner Rolls are a true homemade delight that will elevate any meal. Make them once, and they'll become a family favorite in no time. Enjoy your baking adventure!
- The Greatest Dinner Rolls
Nutrition
Notes
Use bread flour instead of all-purpose for cloverleaf rolls because the higher protein content creates stronger gluten networks that support the three-ball structure without collapsing during the second rise. After years of making these, I learned to slightly underproof the individual balls—they should spring back slowly when poked, not immediately, because they'll continue rising when nestled together in the pan. Choose European-style butter with higher fat content for brushing because it has less water, preventing the tops from becoming soggy while creating that beautiful golden shine reminiscent of Caribbean sweet breads. Shape each small ball with the seam pinched tight on the bottom, then place seam-side down in the pan—this Dominican technique ensures clean separation when pulling apart the finished cloverleaf.


Leave a Reply