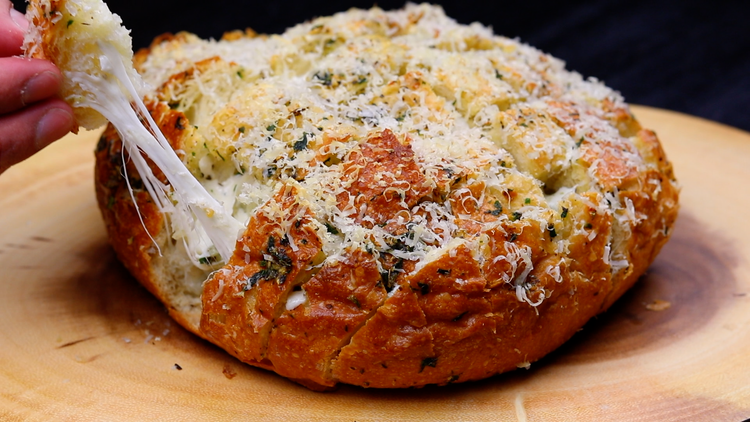
This Pull Apart Cheesy Garlic Bread is one of those recipes you'll find yourself making over and over again. It's simple, delicious, and always gets rave reviews. Whether you're a beginner or a seasoned cook, you're going to love how easy and tasty this turns out!

About This Recipe
Here's something that'll blow your mind: the garlic in pull-apart bread actually becomes more nutritious when you let it sit after mincing. When garlic cells are damaged, an enzyme called alliinase converts alliin into allicin - the compound that gives garlic its punch and health benefits. But here's the kicker: allicin needs about 10 minutes to fully develop, and it's destroyed by high heat. Most people mix their garlic butter and immediately brush it on bread, then bake it - killing most of the good stuff. But in pull-apart bread, those deep pockets protect the garlic from direct heat, and if you let your garlic-butter mixture sit while your bread proofs, you're getting maximum allicin retention. This means better flavor AND more of garlic's anti-inflammatory compounds. In my abuela's kitchen in Santo Domingo, we'd always prepare our sofrito hours ahead - turns out she was maximizing nutrition without even knowing it.
Ingredients for Pull Apart Cheesy Garlic Bread
- 3 tablespoon of Olive Oil
- 3 tablespoon of Unsalted Butter
- 2 tablespoon Italian Parsley, chopped
- 6 cloves of Garlic, minced
- 1 tablespoon of Italian Seasoning
- 8 oz of Mozzarella, shredded or Cubed
- 1 round artisan or sourdough loaf
- Freshly grated Parmigiano Reggiano
Substitutions & Variations
- Italian Parsley: Use fresh cilantro or culantro for a Caribbean twist that adds a bright, herbaceous flavor with more punch than traditional parsley.
- Mozzarella: Substitute with queso blanco or queso fresco for a Dominican-style variation that melts beautifully while maintaining a slightly firmer texture.
- Italian Seasoning: Replace with sofrito seasoning or a blend of oregano, cumin, and garlic powder for a Caribbean flavor profile that complements the garlic perfectly.
- Artisan or Sourdough Loaf: Use Caribbean hard dough bread or pan tostado for an authentic island touch that holds up well to the butter and cheese mixture.
- Parmigiano Reggiano: Swap with aged Manchego or a sharp white cheddar for a different flavor complexity that still provides that essential salty, nutty finish.
- Olive Oil and Butter mixture: Use coconut oil mixed with butter for a subtle tropical note that pairs beautifully with the garlic and herbs.
How to Make Pull Apart Cheesy Garlic Bread
- Preheat the oven to 375 degrees.
- Line a baking sheet with some aluminum foil and place the loaf of bread in the center. Making sure to cut only ⅔ of the way through the bread, cut slits on a diagonal on both sides to resemble a diamond shape (make sure you don't cut all the way through) set aside.
- In a small saucepan, add the oil, garlic, and butter and bring to a sizzle. Allow it to cook together on low heat for just about a minute, remove from the heat, add the Italian seasoning and set aside.
- Using a pastry brush, brush the garlic oil mixture all over the top and between each piece of bread and stuff each piece with a piece (or shredded) mozzarella. Top it off with freshly grated Parmigiano Reggiano.
- Gather up the sides of the aluminum foil that the bread is sitting on and wrap it around the base of the bread. With another piece of foil, wrap the top of the bread.
- Pop it in the oven for 30 minutes, remove the foil after 20 minutes to allow the top to get nice and crispy.
- Enjoy! Buen Provecho!
- Homemade Cherry Cobbler
- French Dip Sliders
- Mozzarella Cheese Sticks
- Homemade Corn Dogs
What to Serve With Pull Apart Cheesy Garlic Bread
This cheesy garlic bread is absolutely perfect alongside my Dominican Pollo Guisado - the rich, garlicky flavors complement the savory stewed chicken beautifully. The bread becomes the perfect vehicle for soaking up every drop of that incredible sofrito-based sauce that makes the dish so special.
For something lighter, pair this with a crisp arugula salad dressed simply with lemon vinaigrette and shaved Parmesan. The peppery bite of the arugula cuts through the richness of all that melted cheese, while the bright acidity cleanses your palate between those indulgent, gooey bites.
Nothing beats serving this warm, pull-apart bread with a steaming bowl of Italian wedding soup or minestrone. The contrast between the creamy, cheesy bread and the clear, herb-filled broth creates that perfect comfort food experience that reminds me why simple combinations often work best.
Frequently Asked Questions
1. What type of bread works best for pull-apart garlic bread?
A round sourdough boule or Italian bread works best. The bread needs to be sturdy enough to hold its shape when you cut a crosshatch pattern but soft enough to pull apart.
2. How do I cut the crosshatch pattern?
Slice 1-inch deep cuts in a grid pattern across the top of the bread without cutting through the bottom crust. This creates pockets for the garlic butter and cheese to melt into.
3. What cheese melts best inside pull-apart bread?
A combination of mozzarella for stretch and Gruyere or Fontina for flavor creates the best gooey, cheesy pull-apart experience. Stuff shredded cheese into every cut.
4. What goes in the garlic butter?
Melted butter mixed with minced garlic, chopped parsley, a pinch of red pepper flakes, and salt. Pour it generously over and into every crevice of the scored bread.
5. What temperature and time for pull-apart bread?
Wrap in foil and bake at 350 degrees for 15 minutes, then unwrap and bake 10 more minutes at 375 degrees to crisp the top and melt the cheese until bubbly.
6. Why do I wrap it in foil first?
The foil traps steam that melts the cheese and warms the bread through evenly. Removing the foil at the end allows the top to crisp and the cheese to turn golden.
7. Can I add other ingredients besides cheese?
Crumbled bacon, jalapeno slices, green onions, pepperoni, or ranch seasoning are all popular additions that transform basic pull-apart bread into a loaded appetizer.
8. Can I use a baguette instead of a round loaf?
Yes — cut diagonal slits along the baguette and stuff with garlic butter and cheese. It makes individual portions easier to pull off. Baking time is slightly shorter.
9. Is pull-apart bread good for parties?
It is one of the best party appetizers — everyone can pull off their own cheesy piece. It looks impressive, is easy to make, and disappears fast. Make two.
10. Can I prep pull-apart bread ahead of time?
Score the bread and stuff with cheese up to 4 hours ahead. Wrap in foil and refrigerate. Add the garlic butter right before baking so the bread does not get soggy.
Pull Apart Cheesy Garlic Bread Video
Pull Apart Cheesy Garlic Bread
Ingredients
Method
- Preheat the oven to 375 degrees.
- Line a baking sheet with some aluminum foil and place the loaf of bread in the center. Making sure to cut only ⅔ of the way through the bread, cut slits on a diagonal on both sides to resemble a diamond shape (make sure you don't cut all the way through) set aside.
- In a small saucepan, add the oil, garlic, and butter and bring to a sizzle. Allow it to cook together on low heat for just about a minute, remove from the heat, add the Italian seasoning and set aside.
- Using a pastry brush, brush the garlic oil mixture all over the top and between each piece of bread and stuff each piece with a piece (or shredded) mozzarella. Top it off with freshly grated Parmigiano Reggiano.
- Gather up the sides of the aluminum foil that the bread is sitting on and wrap it around the base of the bread. With another piece of foil, wrap the top of the bread.
- Pop it in the oven for 30 minutes, remove the foil after 20 minutes to allow the top to get nice and crispy.
- Enjoy! Buen Provecho!
Nutrition
Notes
Score your bread in a crosshatch pattern, but stop about half an inch from the bottom - I learned this after too many loaves fell apart completely. That base keeps everything connected while still allowing the butter mixture to penetrate deep into every layer. Use European-style butter with higher fat content (around 82-84%) because it has less water, preventing the bread from getting soggy while creating those perfectly crispy edges that contrast beautifully with the soft, cheesy interior. Wrap the bread in foil for the first 15 minutes, then unwrap for the last 10-15 minutes. This technique, borrowed from how we steam bread in the Caribbean, keeps the inside impossibly tender while the top gets golden and bubbly. Mix your cheeses in a 2:1 ratio of mozzarella to sharp cheddar - mozzarella gives you those Instagram-worthy cheese pulls, while cheddar provides the sharp flavor that cuts through the rich butter and prevents the dish from being one-note. Storage & Meal Prep:
Store leftovers in an airtight container in the refrigerator. Reheat in the oven at a low temperature or microwave. Note: the bread may lose crispiness upon reheating.
Tried this recipe?
Let us know how it was!Filed Under

Leave a Reply