
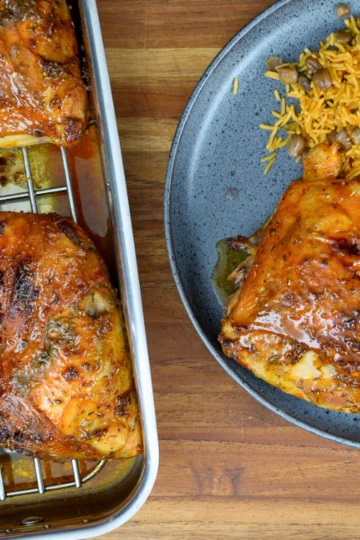
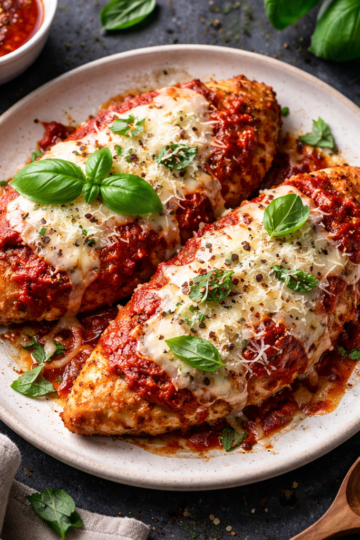
This Crispy Chicken & Rice Bake (No Canned Soup) is pure comfort in a bowl. Warm, hearty, and packed with flavor, it's the kind of recipe you'll want to make all season long. It's simple to throw together and even better the next day as the flavors meld together!
About This Recipe
Here's something that'll blow your mind: the "chicken and rice bake" concept actually started as a solution to World War II rationing, not convenience. Before canned soups became the shortcut in the 1950s, home cooks layered raw rice with chicken drippings and stock, creating what they called "oven pilaf." The genius was in the technique - the chicken fat would render down and create natural layers of flavor that penetrated every grain of rice. This is exactly why our no-canned-soup version works so beautifully. When you skip that processed shortcut and let the chicken do the heavy lifting, you're actually going back to the original method that creates deeper, more complex flavors. The rice becomes almost risotto-like from absorbing those natural drippings, which is something no canned soup can replicate. It's proof that sometimes the old ways really are the best ways.
Ingredients for Crispy Chicken & Rice Bake (No Canned Soup)
- 4 bone-in — skin-on chicken thighs
- 1 cup long grain white rice
- 2 ¼ cups chicken broth
- 1 small onion — finely diced
- 4 cloves garlic — minced
- 1 tablespoon olive oil or butter
- ½ teaspoon paprika
- ½ teaspoon Italian seasoning
- Salt and freshly cracked black pepper — to taste
- Optional garnish: chopped parsley or green onions
How to Make Crispy Chicken & Rice Bake (No Canned Soup)
- Preheat the oven to 400°F (200°C).
- Sear the chicken: In a large, oven-safe skillet or Dutch oven, heat the olive oil over medium-high heat. Season the chicken thighs with salt, pepper, paprika, and Italian seasoning. Sear skin-side down for 4–5 minutes until golden and crispy. Flip and cook for another 2 minutes. Remove and set aside.
- Sauté aromatics: In the same pan (do not wipe it), sauté the diced onion for 2–3 minutes until translucent. Add minced garlic and cook for 30 seconds until fragrant.
- Build the base: Stir in the rice and toast for 1 minute. Pour in the chicken broth and stir well to deglaze the pan. Nestle the seared chicken thighs on top, skin-side up.
- Bake: Cover the pan tightly with foil or a lid and transfer to the oven. Bake for 30 minutes. Remove the foil and continue baking for 15–20 more minutes, until the rice is tender and the chicken reaches an internal temp of 175°F.
- Optional broil: For extra crispy skin, broil uncovered for 3–5 minutes at the end. Let the dish rest uncovered for 5 minutes before serving.
What to Serve With Crispy Chicken & Rice Bake (No Canned Soup)
The crispy chicken pairs beautifully with my Coconut Rice and Beans - the creamy coconut milk balances the savory baked rice perfectly. This combination is pure Dominican comfort food that reminds me of Sunday dinners at my abuela's house.
For something fresh and bright, serve this alongside a simple avocado and red onion salad dressed with lime juice and olive oil. The cool, creamy avocado cuts through the richness of the baked dish while adding that pop of acidity we crave.
Sweet plantains (plátanos maduros) are absolutely essential here - their caramelized sweetness creates the perfect contrast to the savory chicken and rice. Pan-fry them until golden and slightly crispy for that authentic Dominican touch that makes the whole meal sing.
Frequently Asked Questions
1. Why make chicken and rice bake without canned soup?
Homemade cream sauce tastes significantly better and lets you control the sodium and ingredients. It only takes 5 extra minutes and the flavor difference is enormous.
2. What type of rice works best for a chicken rice bake?
Long grain white rice is ideal because it cooks in the same time as the chicken. Do not use instant rice — it will turn to mush. Brown rice needs extra liquid and time.
3. How do I make the homemade cream sauce?
Melt butter, whisk in flour to make a roux, gradually add chicken broth and milk while whisking. Season with garlic, salt, pepper, and herbs. It thickens as it cooks.
4. Should I use raw or cooked chicken?
Raw chicken placed on top of the rice and sauce. It cooks perfectly in the oven while the rice absorbs the liquid below. No need to pre-cook.
5. How do I get the chicken skin crispy on a casserole?
Use bone-in, skin-on chicken thighs. Place them skin-side up on the rice and bake uncovered. Broil for the last 2-3 minutes for extra crispiness.
6. Why is my rice still crunchy after baking?
Not enough liquid, or the pan was not covered tightly enough. Use a foil seal under the lid and ensure the correct broth-to-rice ratio (about 2:1).
7. Can I add vegetables to this casserole?
Yes — broccoli, peas, and carrots are popular additions. Add them during the last 20 minutes of baking so they do not overcook and turn mushy.
8. What temperature and time is best?
375°F for 45-55 minutes covered, then 10-15 minutes uncovered to crisp the chicken. The rice should be tender and all liquid absorbed when done.
9. Can I use chicken breast instead of thighs?
Yes, but bone-in thighs stay juicier during the long bake time. If using breast, check doneness at 35-40 minutes to avoid drying it out.
10. How do I store and reheat this casserole?
Refrigerate covered for up to 4 days. Reheat in a 350°F oven with a splash of broth and a foil cover to add moisture back. Avoid microwaving if possible.
Crispy Chicken & Rice Bake (No Canned Soup) Video

Crispy Chicken & Rice Bake (No Canned Soup)
Ingredients
Method
- Preheat the oven to 400°F (200°C).
- Sear the chicken: In a large, oven-safe skillet or Dutch oven, heat the olive oil over medium-high heat. Season the chicken thighs with salt, pepper, paprika, and Italian seasoning. Sear skin-side down for 4–5 minutes until golden and crispy. Flip and cook for another 2 minutes. Remove and set aside.
- Sauté aromatics: In the same pan (do not wipe it), sauté the diced onion for 2–3 minutes until translucent. Add minced garlic and cook for 30 seconds until fragrant.
- Build the base: Stir in the rice and toast for 1 minute. Pour in the chicken broth and stir well to deglaze the pan. Nestle the seared chicken thighs on top, skin-side up.
- Bake: Cover the pan tightly with foil or a lid and transfer to the oven. Bake for 30 minutes. Remove the foil and continue baking for 15–20 more minutes, until the rice is tender and the chicken reaches an internal temp of 175°F.
- Optional broil: For extra crispy skin, broil uncovered for 3–5 minutes at the end. Let the dish rest uncovered for 5 minutes before serving.
Nutrition
Notes
Use jasmine rice instead of long-grain white because its slightly sticky texture absorbs the chicken drippings better, creating that creamy, almost risotto-like consistency that makes this dish special. After making this dozens of times, I've learned to nestle the chicken pieces skin-side up but slightly tilted - this lets the fat render down into the rice while keeping the skin crispy and elevated. Buy chicken thighs with the skin on, even if the recipe doesn't specify - the extra fat and collagen create a richer base for the rice and prevent it from drying out during the longer bake time. Add your liquid in two stages: half before covering with foil, then the remaining liquid halfway through cooking - this prevents the rice from getting mushy while ensuring even absorption throughout the bake.

Leave a Reply